Perennial of the Week - Lavender 'Munstead'

Lavender_Munstead_wcsw.jpg

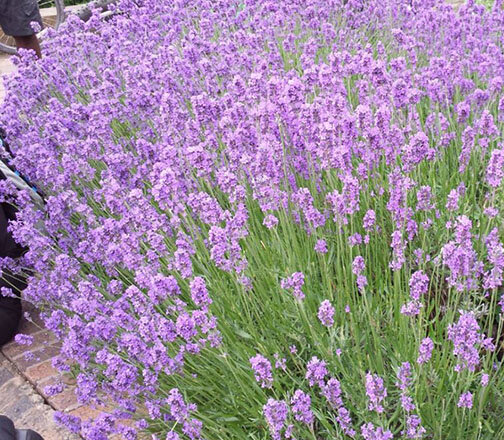
'Munstead' Lavender (Lavandula angustifolia) is an English Lavender that has fragrant, cool lavender-blue spikes and gray-green, mounded foliage. Both foliage and flowers are highly aromatic. Leaves are evergreen in warm winter climates. This variety is early flowering and tolerant of tough growing conditions including heat, humidity and drought. It grows to a compact height of 12 to 18 inches and produces masses of lavender blue flowers from late spring well into summer. You can tuck this lavender into your herb garden, but it is also lovely when planted with other colorful perennials in borders, planted in a massive swath where it can sway in the breeze, or set in a pot on the patio where you can enjoy its pleasant scent. It is excellent in fresh or dried bouquets.

Lavender_Munstead_D_wsw.jpg

English lavender, has been a mainstay of herb gardens for many years. Despite its common name, it is not in fact native to England, but comes primarily from the Mediterranean region. It was reportedly named English lavender because of its ability to grow well in the English climate. This “true lavender” is commercially planted for harvesting its oils for use in perfumes. Lavender flowers and foliage are also popular additions to sachets and potpourris. English lavender varieties are more often used for culinary purposes than other types of lavender. Attracts butterflies and is bee friendly. Deer and rabbit resistant. Tolerates dry soil, shallow-rocky soil, and air pollution.

Lavender_Munstead_Home_Landscape_wcsw.jpg

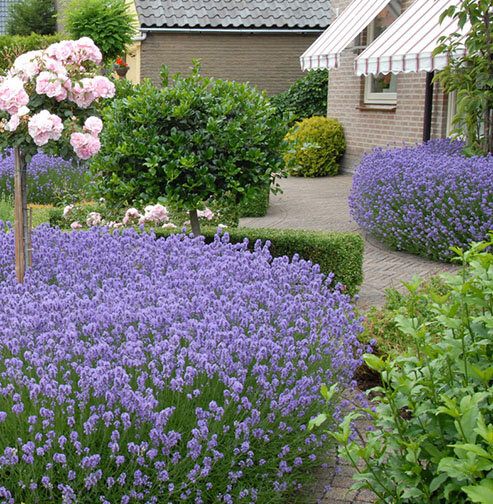
Plant 12 to 18 inches apart in average, dry to medium, well-drained, alkaline soil in an open area with full sun and good air circulation. Root rot commonly attacks plants grown in poorly drained soils. In an herb or perennial bed, ensure good drainage by planting lavender on a small mound. It prefers a light, sandy soil with somewhat low fertility. Lavender survives well in dry conditions. Do not over-water and allow the top 2” of the soil to dry before watering again. Remove faded flowers to promote continued bloom. Prune to shape in spring after new leaves appear. Prune back to 8” in spring every 3 years to control plant size and to promote robust, new growth. When there is a lot of heat and humidity, fungus can attack the plants, turning the leaves brown. To minimize the chance of having such a problem, mulch with pebbles or sprinkle sand around the base of the plant for faster evaporation. If you cut the blooms, trim in a way that thins the plant a bit, leaving it open for better air circulation. English lavender has slightly better winter hardiness than lavandin (Lavandula x intermedia) for our area, but still may appreciate a sheltered location and winter protection. Plants may not survive in winter if soils are not well-drained and/or if temperatures dip below zero degrees without protective snow cover.

Lavender_Munstead_B_wsw.jpg

Flowers will keep their perfume for months when you harvest just before they are entirely open. To dry flowers, gather a bunch of stems and hang them upside-down in a dark, well-ventilated place to preserve color and keep the stems from molding. Fresh flowers may be used in sauces, marinades, and desserts. Handle fragile dried blossoms with care and use them in teas, salts, potpourri, sachets, and crafts.


Turtlehead Tiny Tortuga - Perennial Plant of the Week

Turtlehead_Tiny_Tortuga_Wc.jpg

Turtlehead (Chelone obliqua) plants are native wildflowers that adapt beautifully to garden conditions. This cute variety of Turtlehead is more compact growing 12-18” wide and 12-16” tall. Tiny Tortuga forms an upright, bushy mound of thick, dark green foliage. Plants produce upright stems of large dark pink-rose hooded flowers that bloom late summer into fall. Showy and long lived.

As a native wildflower, Turtlehead will do well planted near or around water features in your garden. Nice in rain gardens, bogs and pond side. Because of its small size, Tiny Tortuga is a great option for containers and borders. Also good for mass plantings and cut flowers. It performs best in evenly moist conditions with fertile loamy soil with abundant organic matter. Turtlehead looks great when planted in its native woodland setting. And, if it’s happy there, it will slowly naturalize to form an exquisite groundcover. Hardy in USDA zones 3 to 8.

Turtlehead_Tiny_Tortuga_d_wc.jpg

Tiny Tortuga is easy to grow. Plant in full sun to part sun. It likes a rich, slightly acidic soil. The crown of the plant should rest just at or above the soil surface after watering in. Keep the soil continually moist with a garden hose or sprinkler while the plants set root and throughout their growing and blooming season. If your plants start to get floppy, prune or pinch back the stems of established plants in mid-spring. Since turtlehead blooms late in the season, there is no reason to deadhead spent flowers. You can leave the flowers to dry, and then collect the seeds if you like. The plant will self-seed in moist soils. Propagate by division, cuttings or seed. Mulch each fall with shredded leaves to maintain a moisture-retaining humus. Turtlehead is rarely bothered by insects or disease. However, it can develop a powdery mildew due to moisture fluctuations. Keeping the plants evenly moist should alleviate this problem.

Turtlehead Tiny Tortuga attracts butterflies and hummingbirds and is bee friendly. It is also deer and rabbit resistant. The varied colors of Chelone combine well with other late-season bloomers, like sedum, Joe Pye weed, and anemone. Additionally, since it likes moist soil, it naturally partners well with ferns.

Turtlehead_Tiny_Tortuga_B_wc.jpg

Share this:

Anemone - Perennial Plant of the Week

Anemone_japanese_white_w.jpg

Also known as windflower, anemones are grown for their beautiful, nodding blooms on long, wiry stems. The common name is derived from the Greek word anemoi, which in English means “winds”. The foliage looks similar between varieties, but size and bloom times vary between spring, summer, or fall. Fall-blooming Japanese anemones are particularly noteworthy because they fill the midsummer-to-fall gap in gardens. Flowers range from white to pink to rose, with yellow anthers surrounding a green/yellow center.

Anemone_Blooms_Pink_w.jpg

Anemones’ timeless grace enhances any garden. Depending on species, anemones can be some of the earliest perennials up. Those spring plants typically cover woodland floors with delicate, nodding blooms in soft shades, most often white, rarely tinged pink or purple. But the true showstoppers are fall-blooming anemones. These larger plants come in many shades of whites and pinks with petals ranging from single rows to double. From later summer to fall, there is no other perennial flower quite like Anemone in the border. They are prized for their late summer color that lasts into the fall. Their graceful flowers are freely and continuously produced on tall stems over lush mounding plants. They are also good to use in containers, mass plantings and for cut flowers. They are deer and rabbit resistant.

Anemone_Pink_w_foliage_w.jpg

Perennial anemones are easy to grow, and once established, they can create large colonies of plants for grand displays. Plant in an area that receives part shade (protected from the hot afternoon sun) in well-drained soils rich in organic matter. If needed amend the soil with the addition of organic material to raise the level 2-3″ to improve the drainage. Peat moss, compost, ground bark or decomposed manure all work well. The extra organic matter will help keep a consistent moisture in soil, which will help avoid browning and crisping on leaf edges.

Anemones spread by underground rhizomes that multiply readily; in some cases they can be almost aggressive spreaders. However, their shallow roots make them easy to dig up. Water as needed during active growth periods; about 1″ of moisture per week is a good estimate. After blooming has finished for the season leave the foliage in place; don’t cut it off. The leaves will gather sunlight, create food through photosynthesis and strengthen the bulbs for the future. For a tidy appearance, remove old foliage before new foliage emerges in early spring. Divide clumps every 2 to 3 years in early spring. In shadier plantings, keep an eye out for powdery mildew, which can be a mild nuisance.


Share this:

Garden Solutions - July 2020

Garden_Porch_Hanging_Baskets_PW.jpg

Well summer has come with a vengeance of heat and humidity. This IS Missouri, right? This summer is seeing the opening of outdoor playgrounds, stores, facilities and so much more. Now is the time to gather and celebrate each other and enjoy nature! But please still do it at a safe distance. 

We have all experienced a NEW spring never seen before with this COVID virus. We have learned from it, became more appreciative of our surroundings, and of family and friends. Now let us get back to keeping our little pieces of sanctuary (and sanity) in tack and enjoyable.

It’s not too late to plant shrubs, perennials and annual flowers, but you will need to give them a little TLC for the summer.

If Japanese beetles are attacking your plants, you have several from trapping (the safest) to spraying them. Japanese beetle traps are readily available and do a fantastic job of eradicating the problem naturally. 

Hot, dry weather is ideal for spider mite development. Damage may be present even before the webs are noticed. With spider mite damage, leaves may be speckled above and yellowed below.  Evergreen needles appear dull gray-green to yellow to brown. Spray with permethrin to control this critter. 

IrrigationDrip-Sprinkle-W.jpg

Water conservation is of the utmost importance during our dry summer months. Water where it counts,  at the roots, not the leaves. Drip irrigation systems in landscape beds do wonders for water conservation and are easy for the homeowner to install. Trees and shrubs would also benefit from a deep root watering this time of year. You can use a deep root feeder (without the fertilizer) for this purpose. Water plants around the drip line for best success. Doing this every 2-3 weeks is beneficial.   When you mow your grass, cut it less frequently and at a higher level. Longer grass blades shade the soil and conserve moisture. Plant drought tolerant, native plants where possible. Native plants are becoming a true staple in the landscape.

Check your plant containers daily for water. Hanging baskets will need a drink at least once a day, sometimes even twice a day, depending on the weather. Provide water in the garden for birds during dry weather and they will repay you with wonderful antics and bird song. Enjoy nature and your gardens this summer. You will not regret it.

See you in the Garden,
Sandi Hillermann McDonald

Report Dying Sassafras! - Missouri Department of Conservation

While not currently known in Missouri, laurel wilt has been found within 100 miles of our southeastern border in western Kentucky and Tennessee. This invasive, tree-killing disease poses a serious threat to a common and widespread understory tree—sassafras—as well as its close relatives, spicebush and federally-endangered pondberry.

Laurel wilt is a lethal vascular wilt disease that rapidly kills entire clumps of sassafras. The disease is spread to new areas when the tiny, wood-boring redbay ambrosia beetle deposits spores of the fungus Raffaelea lauricola in healthy trees.

Symptoms of laurel wilt include:

  • Leaves rapidly wilt, turn reddish-brown, and drop from the tree in mid to late summer

  • Entire clumps of wilted or dead sassafras trees, as the disease spreads through roots

  • Dark staining in the sapwood, exposed by removing bark

  • Tiny ambrosia beetle exit holes in the bark

  • Frass ‘toothpicks’ may protrude from beetle exit holes

Please be on the lookout for laurel wilt this summer! Send reports of dying sassafras trees to the MDC Forest Health Program:  Forest.Health@mdc.mo.gov


Sassafras_Laurel_Wilt_MDC_GFC_w.png


More on Laurel wilt from the University of Arkansas Extension Service website: https://www.uaex.edu/environment-nature/ar-invasives/invasive-diseases/laurel-wilt.aspx

Tips for the Garden - June 2020

            I, for one, cannot believe it is the first of June already. This year is really flying by. This is the month for picnics, vacations, family reunions, and for just enjoying the outdoors in general. I truly hope we can get back to these ‘old’ traditions as our new norm.

            If you are new to planting or gardening this year, please stay in touch when you have questions so we can help you through your new experiences.

            The hot days of summer are stressful to every living creature, including your plants.  Not only does mulch hold in moisture, it also keeps the soil cooler, so your plants will be less heat-stressed.

WateringNewEvergreen.jpg

            One of the most common questions that we receive at this time of year is, “How much do I water my ______?” I will explain some basic guidelines here:

            Vegetables and Bedding Plants planted in the ground: established plants need at least one inch of water per week. Check the soil around the plants, when it is dry one inch down, it’s time to water.

            Container Gardens and Hanging Baskets: check your containers every day for water. Either test the soil by touch or lift the pot to check its weight. Most baskets and many containers will need to be watered once a day, depending on the weather. I suggest you fertilize once a week.

            Perennials: newly planted perennials need daily watering until established, at least  two weeks, depending on weather. After they show signs of new growth, apply a one inch per week rule.

            Trees and Shrubs should be watered every 4-5 days for the entire first year after planting unless rainfall is abundant. Place the end of your hose next to the base of the plant and let the water trickle very slowly for about two hours. This will allow the root zone to become thoroughly saturated.

IrrigationSprinklerOnLawnBeds.jpg

            Established Lawns: your lawn should be watered when the grass blades don’t bounce back after being walked on. One inch of water per week should keep your lawn green and healthy.

            Newly Seeded or Sodded Lawns: for better germination, I suggest you mulch grass seed with straw as soon as it is planted. Once seed has germinated or sod has been laid, they must not be allowed to dry out. Water daily with a sprinkler until there is good growth. Once established, go back to the one inch per week rule.

            So, continue to enjoy your outdoor spaces and make relationships with your plants! They can give you so much in return!

See you in the Garden,
Sandi Hillermann McDonald